Agilent’s U-Series Multimeters have the ability to be talked to via an infrared interface (and some of them even feature an OLED display), either through Agilent Keysight’s slightly overpriced USB-To-IR Adapter, or by building your own. If you intent to follow the latter path, be sure to read Josip Medved’s Info about the Adapter; it covers pretty much everything you need. There’s also a YouTube-Video with a more sophisticated (and probably oversized) approach.
LabView
With the communication working (you might test it with Keysight’s own logging-tool), it’s probably more interesting to be able to control the device using LabView. Unfortunately, I could not find any libraries, and the documentation is limited to a post on Philipp Klaus’ blog describing the basic command set.
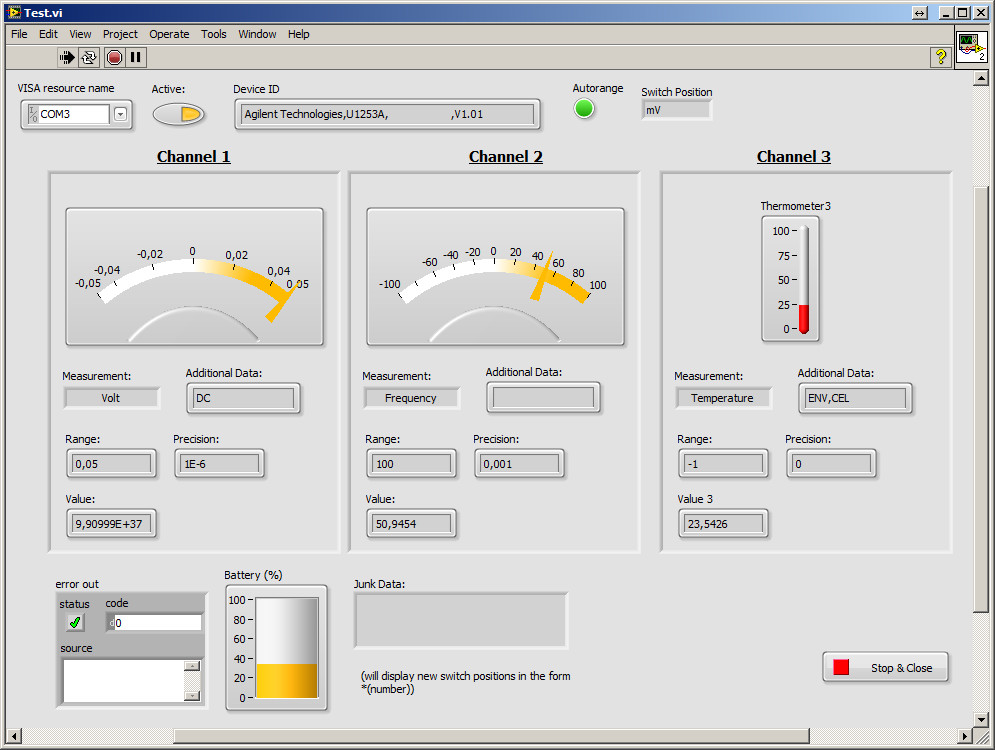
In short, the Device features 2.5 “channels”, or let’s call them data-streams; it is capable of e.g. measuring voltage and frequency of an AC source simultaneously and can additionally report the current ambient temperature; although that feature might not be of so much use. In principle, to continuously read out the data measured by the multimeter, you might want to query it’s current setting (unit, range, precision), it’s value or status (like auto-range, position of the rotary switch etc.).
Command Set
To find out how to talk to the device, and how to interpret it’s response, I used a Serial Analyzer in conjunction with the original software. The result is a LabView-Library that’s capable of handling a reasonable part of all passive commands (no controlling of the device so far only limited support for configuring the device so far) – the lib, however, should be considered in alpha-state and might still contain bugs. Every command sent from the computer should be terminated by a single linefeed (0x0A, “\n” etc.); the device itself terminates with carriage return and linefeed. On error, the device will return “*E\r\n”. Most of the time, the meter acts as passive command-responder, except when the user turns the rotary-switch – in that case, the device sends the switch position counting from 0 (and excluding the “off” state – which means you won’t be able to detect a “switch-off” event except with a communication timeout) preceded by a star, i.e. “*1\r\n” for Volt.
The commands I saw on the line include:
| Command | Meaning |
|---|---|
| *CLS | allways sent to the device on the beginning of a command set. Probably resets the last read-command |
| *RST | said to reset the meter, up to now I didn’t see any actual change in behavior |
| *IDN? | Request identification of the meter. Result is a string devided into 4 parts by commas, i.e. “Agilent Technologies,U1253A,MY12345678,V1.01”, reading the company’s name, the model- and serial number and it’s firmware version |
| STAT? | Returns the current device status. I could only identify two parameters so far. Sample: “000000I00012L00204001” (Character 17, 2 in this case, indicates the current position of the rotary switch, whereas the last digit is set to 1 when AUTO-range is enabled) |
| CONF? (or) CONF? @# | Request the current configuration (for channel @#) of the meter, see the next section |
| FETC? (or) FETC? @# | “Fetch” either the 1st display/stream/channel (or however you’d like to call it) or request a specific one (i.e. “FETC? @2” for the auxiliary reading, i.e. the frequency of an A/C voltage) The meter always returns a single floating point number. |
| READ? | Return the current meter reading, only applies to the 1st channel/stream/dataset… |
| SYST:BATT? | Get the meter’s battery status, returns a single floating point value in %/fully charged. |
Read configuration options
Following a “CONF?”, the device answers with it’s current setting (i.e. voltage or frequency) and a few parameters. To request the configuration of a specific “channel”, send “CONF? @#” replacing the # with a number from 0 to 2. The type of voltage or current, or any subtype of measurement is appended to the basic setting with a semicolon. Additional parameters are separated from this basic information with a space, again separated by commas. Example: “VOLT:ACDC +1.00000000E+00,+1.00000000E-04” denotes an AC/DC voltage-measurement with a range of 1 Volt an a maximum resolution of 0.1 mV. The following table will give some more detailed information:
| Option | Meaning |
|---|---|
| VOLT(:type) | The channel will return a voltage. When configured for DC voltage, it’s just “VOLT”. For AC, AC/DC or DB(V/M) measurements, the corresponding option follows with a semicolon, i.e. “VOLT:ACDC”. Additional parameters are the measurement rage in Volts and the value for the last (4th) digit (i.e. the precision). These parameters will not be returned for dBV or dBM measurements. |
| CURR(:type) | Current measurement. Again, DC is the default without a semicolon, AC and ACDC are reported seperately. For the mA/A measurement range, there’s an additional measurement mode displaying the current as a percentage between 0 mA/4 mA and 20 mA, the corresponding return value is “CPER:4-20mA” or “CPER:40-20mA”. Parameters are range and precision. |
| RES | Resistance, parameters are again range and precision. |
| COND | Conductance measurement, parameters are range and precision. |
| DIOD | Diode measurement, this setting doesn’t seem to return any range or precision. |
| CAP | Capacitance, parameters as for VOLT or CURR. |
| CPER:(range) | “Percentage Scale”. Probably made for adjustment measurements, displays a percentage of the measured current in the range of [4..20] mA or [0..20] mA. The range is given after the semicolon, i.e. “CPER:4-20mA”. Additional parameters like for CURR. |
| FREQ | Frequency in Hz, parameters are again range and precision. So far only seen for the second channel. |
| PRES | The value of the frequency counter (channel 1). Does not return any reasonable range, only one parameter: 1 for direct counting, and 100 for a prescaler (divider) or 100. |
| PULS:(type) | Pulse-Width measurement. Might return either a percentage of high-value to low-value (“PULS:POUT”) or the pulse width directly (“PULS:PWID”). Ranges will show the values of the voltage measurement. |
| TEMP:(type) (unit) | Temperature measurement, the only supported setting for the third channel. Type might be either “K” or “J”, depending on the configured type of the thermocouple – or “ENV” denoting the meter’s environment measurement (channel 3). The only parameter is the unit, either “CEL” for Celsius or “FAR” for Fahrenheit. |
| CONT | Continuity measurement, similar to RES but with (if configured) audible tone on contact |
| *E | Error, i.e. an unused channel. |
Send configuration
Different “layers” of functionality for specific switch-positions can also be selected via Software. The device accepts two lines of configuration options after a “CLS*” command (I didn’t test it without), the possible options depend on the position of the rotary switch. An erroneous command will be acknowledged by “*E”, the configuration, however, might still be partially applied and might lead to instable operation (i.e. incomplete or overlapping data on the display). Success in changing the configuration will not trigger any response. Note that, upon selecting additional (calculated) quantities, those might become the primary reading; selecting AC-Voltage and Frequency for example will change the first channel to frequency, and reports the voltage on the second channel.
Each switch position allows a different set of options, as can be seen in the following table:
| Rotary Switch | Command | Meaning |
|---|---|---|
| 0 (V/AC) 1 (Volt) 2 (mVolt) | CONF:VOLT{:AC,:DC,:ACDC} (range) | Change the range of the AC voltage measured, possible parameters are 5, 50, 500 and 1000 (Volt each) or 0.1, 0.5 and 1 (also Volt, valid for position 2). Omit the range parameter to enable auto-range. Parameters AC, DC and ACDC are only valid for switch-positions 1 and 2. |
| CONF:FREQ | Measure the frequency additionally to the voltage, it will become the primary reading. Auto-range only. | |
| CONF:PULS:(type) | Measure pulse-width (primary). Possible types are PDUT/NDUT (positive/negative edged dutycycle in %) or PWID/NWID (positive/negative edged step-width in ms) | |
| CALC:FUNC {DBV,DBM} | Set the primary channel to read calculated dB/V or dB/M values | |
| 3 (Resistance) | CONF:RES (range) | Configure the resistance measurement; ranges are none (auto), 500, 5k, 50k, 500k, 5M, 50M or 500M (Ohms each of course). |
| CONF:COND | Measure conductance, only one range is supported and may not be configured (500 nS) | |
| CONF:CONT (range) | Measure continuity; accepts the same ranges like CONF:RES | |
| 4 (Diode) | CONF:DIOD | Standard, set to Diode-measurement. Range is fixed to 2.1 V |
| CONF:FCOU (range) | Select the frequency counter function. Range is either 1 for direct counting, or 100 to select a prescaler of 1/100 to measure frequencies of up to 20 MHz | |
| 5 (Capacitance) | CONF:CAP (range) | Set the range of the capacitance measurement, either none (Auto) or 10n, 100n, 1000n, 10u, 100u, 1000u, 10m or 100m (Farad each). |
| CONF:TEMP (type),(unit) | Switch to temperature measurement. Type is either K or J for {K/J}-Type thermocouples. Unit is either FAR-enheit or CEL-sius. | |
| SYST:TCOM (0, 1) | Enable / Disable 0° compensation | |
| 6 (µA) 7 (mA/A) | CONF:CURR{:AC,:DC,:ACDC} (range) | Set the current measurement to DC, AC or AC/DC measurement and configure the range to autorange (none) or 500u, 5000u (µA) for position 6 (µA) or 0.05, 0.5 (A) for Position 7. |
| CONF:CURR:PERC | Display the measured current as a percentage – no direct range parameter! | |
| SYST:CPER (range) | Configure the range of the Percentage Scale measurement – either “0-20” or “4-20” (mA each). | |
| for Additional parameters see Positions 0 to 2! | ||
| (possibly) All | SYST:TENV (0, 1) | Enable / Disable measurement of the environment temperature, will be readable on channel 3 |
A few VIs exist already to configure the device using the above commands.
Update: Configure PWM Output
The last available switch-position (#8) will allow you to operate a PWM output with 3 Volts/peak and an instrumental precicion of 1/256 of the frequency set. The device features three commands to program the PWM output. “CQU:FREQ X” sets the output frequency to X, possible options can be taken from the manual and range from 0.5 Hz to 4.8 kHz. The pulse width can be controlled from 0.39 % to 99.609 % / total, given in values from 1 to 255. The device has two commands to set the pulse width, “CQU:PWID X” will program the pulse width and display the value in ms, where as “CQU:DCYC X” will display the duty cycle in %.
Code
The code including the sample program can be found on bitbucket.